Weekend Project

The weekend project is coming along.

The floors are finished in the living room and almost finished in the dining room.

Daniel is working very hard to get everything finished by later this evening.

Evelyn and I got out of the house yesterday and enjoyed our time with my family at my parents home.

I felt bad leaving him but he basically begged us to leave. I guess we keep him from doing work!

I'm sure he is exhausted from this weekend and is ready to take a nice hot bubble bath. I'm pretty sure he feels it in his back (and all over) today.

Some photos...


Gosh, I swear whenever we do one project I have so many more ideas for future projects. I dislike how the stained staircase looks next to the new wood floors. Yuck! Talk about a major clash in stain colors.

I plan on painting the bottom white and then staining the handrails to match the wood floors. Hopefully that will tie everything together!

I hope everyone had a great Memorial Day weekend! Thank you Daniel, and others that serve(d) our country!

Oh...and quick question - is anyone else having issues with blogger spacing on posts? I am getting so frustrated! I'm about to make the move to word press. Have any of you moved your blogs over to a different platform?

Wood Floors

On Mother's Day weekend, my amazing husband surprised me with new wood floors for the living and dining room. Well, he didn't really "surprise" me...I guess the fact that he suggested we put down wood floors in the dining room before finishing the wainscoting caught me off guard. I then added that we should take the wood floors into the living room.

And he agreed!

We ordered the wood floors about 2 weeks ago...
Right after ordering the flooring Daniel slowly (well over the next week or so) removed all the baseboard around the carpet. No, rush...we had to wait on the flooring to arrive anyways.

Next, we had to move all the furniture out of the room. What is this "we" nonsense...he moved the furniture with the help of a friend. I enjoyed watching the action take place.

This is what the room(s) look like.

Here is the dining room.


{wainscoting will be all the way up the wall with a ledge at top}

and here is the living room.

I don't expect this to be finished until after the holiday weekend.

I'm really excited to get these rooms finished. We haven't painted any rooms on our main level. We still have builder paint after 3.5 years!

After the wood floors are down and the dining room is complete...I will pick out some paint colors!

Creating Custom Blog Buttons + May Giveaway Winner

I designed my blog. Well, kinda...I basically added a few buttons on the side bar, a header, and a fancy background to the basic blogger template.

Many of you asked how I created the blog buttons on the side of my blog.

I made a tutorial so you can create nifty unique buttons for your blog using Microsoft Paint.

Microsoft Paint is very easy to use and I find it to be the most user friendly for people that aren't experienced in fancy programs such as Adobe Illustrator.

For this tutorial we are going to create this button:


 {feel free to use any of the buttons in this post for your blog...just please make a note somewhere on your blog where you got the buttons!}

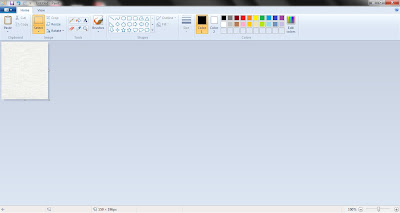
{Step One} Copy this blue linen background...to do this hover over the image, right click the mouse and select copy.


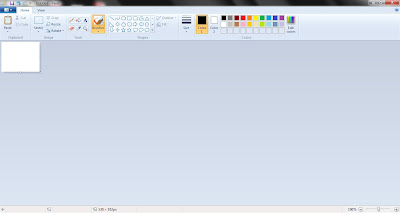
{Step Two} Open Microsoft Paint.


{Step Three} Right click on the mouse in the Microsoft Paint program and select paste.


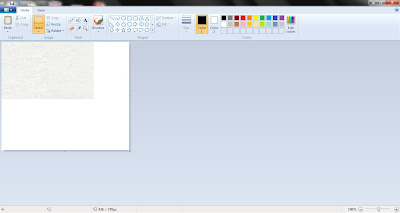
{Step Four} Stretch the paint canvas by selecting the corner and drag it out to be larger.


{Step Five} Paste the blue linen once again and line it up next to the first blue linen design.


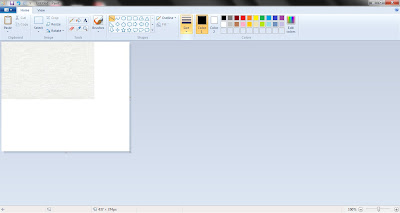
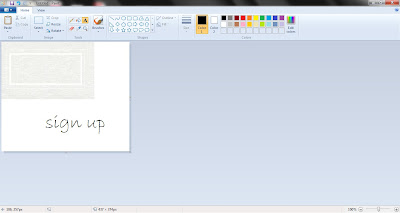
{Step Six} Go to the line tool and select the second thickest line.


{Step Seven} Select the box tool and create a rectangular box. Be sure to select the color to be white.  I basically eyeballed this to be roughly 2.5in x 1.5in.


{Step Eight} Go to the line tool again and select the thinnest line. This will be the outermost box.

{Step Nine} Create a thin line box outside of the thick box. Be sure to select the color to be white. Once again eyeball it to be even around the innermost box.


{Step Ten} Create a text box somewhere in the white area on the canvas.

{Step Eleven} Select a font, any font to create your tab. For this tutorial I used Bradley Hand ITC. I also made it size 48 font.


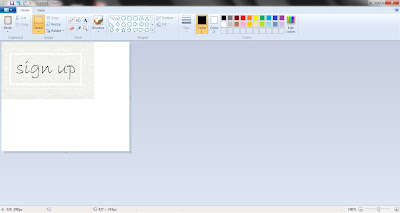
{Step Twelve} Click the dashed rectangular box (sorry I don't know the technical Paint terms). Create a box around the text you just typed. Be sure that transparent is selected.


{Step Thirteen} Drag the text to the center of the white boxes you made earlier. Again, a lot of eye balling here...It is going to be imperfectly perfect!


{Step Fourteen} Click on the dashed rectangular box again, but be sure that the transparent button is NOT selected and make a box around the entire sign up button and overlap the blue linen.

{Step Fifteen} Move this rectangle over to the uppermost left corner.


{Step Sixteen} Drag the corners of the white canvas in and even out the sides.


There you go! Sorry for all of the steps. I hope this helps you create amazing side bar buttons for your blog. Below I have included several more tabs you can use on your blog!


You can use different backgrounds to match your blog. Just try some free clipart sites...or google fabrics.

I will have a tutorial in the future for making a custom header.


The winner of the May Giveaway is...

Cupcake Couture

Please email me at evelynkatedesigns@gmail.com with your address and your initials for the custom notecards.

Favorite Blogs

I get many inspirations from all different types of blogs. Below are a few of my favorite. I am finding new blogs each day that I adore...so with time this list will grow!!

{they aren't listed in any specific order}

-----------------------------------------


-----------------------------------------


-----------------------------------------


-----------------------------------------

WhipperBerry

{whipperberry}

-----------------------------------------

* Remodelaholic *


{remodelaholic}

-----------------------------------------


{the nesting place}

-----------------------------------------


-----------------------------------------


{young house love}

-----------------------------------------

These are just a few of my favorite blogs. Have fun browsing today!

-----------------------------------------

Don't forget to comment on the {May Giveaway}. The winner will be announced TOMORROW!


Party Decorations: Envelope Liner Printable


This weekend I'm working on all of Evelyn's Sweet Shoppe birthday decorations.

:: invitations ::
:: creating the labels for the candy jars ::
:: making custom goodie bags ::
:: bunting for the candy table ::
:: envelope liners ::
:: cupcake toppers ::

Oh, and I think I'm going to make a paper flower bouquet.

Here are the completed invites...

I made two different envelope liners.

I wanted to share a template for cupcake envelope liners and the liners I'm used for Evelyn's invites.


These liners will fit in a square A7 envelope. Simply print these on white text weight paper.

Disclaimer: For personal use only. If you would like to share this download with your readers please link them back to my blog to download.

Don't forget to comment on the {May Giveaway}. The winner will be announced on May 24th.


Have a great weekend :)

Flowers

Last week it was almost 90 degrees outside.

Absolutely beautiful and sunny - maybe a little stuffy for this 7 month pregnant girl...but a nice change.

And this week we are lucky to hit the 50's. Indiana weather is so funny.

Well, the teaser weather last week pushed me to go out and buy some flowers to put in my "dead" mum pots. Yes, I was too lazy to remove the dead plants from two seasons ago.

I wanted to wait for the sun to come out to take these photos but I don't see an end to this rain.

My husband planted all the flowers. Yes, I went and picked them out...I pointed what I wanted planted and he was such a sweetie to do it for me.

Let me tell you...I doubt I will ever get him to plant flowers again!

This is the entry way to our home.


Our back deck also has flowers.


These are the flowers by our garage door.


Have you planted flowers? I hope I didn't do it too early this year. For some reason I didn't think our weather would dip down in the 30's during mid May!

Weekly Cleaning Calendar: Printable

It is no joke that cleaning the house is a time consuming task.

Recently put on "working bed rest," I am unable to uphold my other duties at home...

{as in cleaning and making dinner}

I feel like such a lazy bum getting home from work and sitting on the couch until bed time.

My husband and I normally split up all the household chores. Well, he does laundry and dishes and I do everything else.

Now he is stuck doing it all!

He has told me over and over again to make a cleaning list.

Hmm, I guess I might've complained once or twice or a thousand times that I felt like I was doing all the household chores.

For some reason boys don't seem to understand that sometimes you need to vacuum more than once a week. We do have 2 dogs, a cat, and a toddler!

To keep my cleaning OCD at ease I created a cleaning checklist for Daniel to follow weekly.


It might be over kill...but your house will be guest ready if you follow these every day tasks.

In the future I will have a quaterly/semi year and yearly cleaning check list.

You can download your own weekly cleaning calendar. I left extra spaces for each day so you can add your own cleaning routine.


As always please use this printable for personal use only. If you would like to share this printable please link your readers back to this post for downloading.

Thanks so much for the support and happy cleaning!

Storage Bins & Sweet Shoppe Party Update

The storage bins finally arrived!

This is what they look like in the new "custom" closet.


I'm in love. They are practical and look so darn cute!

Now I need to decide if I want to order more for the other storage system....

------------------------------------------------------

Today, I picked up some items for Evelyn's Sweet Shoppe Birthday Party. I bought several glass jars from HomeGoods.

By several I mean 8 large jars.

I spent less than $90.

8 jars with lids for less than $90. I'll take em!

I'm budgeting around $250 for her second birthday.

Glassware: $90
Decorations: Free
Napkins/Plates/Cups: Free (all left over from her 1st birthday)
Invitations: Free (well except shipping..so $10)
Labels: Free
Goodie Bags: $20
Cupcakes: $30
Candy and drinks: $100

I think I will be able to stay within this budget. Actually, I will probably spend a lot less. I decided that I'm not making the cupcakes this year. There are so many things to get ready that it will be easier to just purchase them from a bakery. Plus, should I be slaving around an oven all day? I don't think so! haha

Any suggestions where I can buy some cute/cheap candy? Or even what candy to buy?! I want to stick to pinks for everything.

------------------------------------------------------

One final thing - there will be another free printable on Monday or Tuesday!

Come back to get organized :)


Evelyn's 2nd Birthday - Invites

Evelyn's 2nd birthday is just around the corner. Her official birthday is on June 13th. I am planning a party on Sunday June 12th.

I can't believe she is almost 2. The time is flying by!

I remember when she looked like this...


and now she is getting so big!


I'm thinking of themes right now.

I need to plan way ahead or this will never get done.

Evelyn is in love with sweets. She enjoys "kee koo's" aka cookies after dinner. 

I'm starting to gather ideas relating to a sweet treat party (evelyn's sweet shoppe). Of course she won't be able to enjoy the lollipops but she will be able to eat all the cookies and cake she wants! 

I came up with this invitation after work today.

It is a rough draft but I wanted to share what I created so far!


I am by no means a graphic designer. I'm learning how to use adobe on my own.

I'm happy that the invites are semi-finished!

------------------------------------------

Update: I hope you can view the invitation now!

Curtains

Daniel put up the curtains for Harrison's room.

At first I was going to make my own curtains but these just came out and are exactly what I'm looking for...

Star Jacquard Blackout Panel
{via Pottery Barn Kids}

Yeah, they are a little pricey at $89 for a 96" panel but so worth every penny! The curtains are very thick and block out the light.

I decided to order the 96" panels and hang the curtains higher than the window. I wasn't sure how high I wanted to go so now we have roughly 2" on the floor.

To solve this issue I bundled the curtains towards the middle and made a slight poof. This is a very simple and easy fix without sewing.

-----------------------------------------

Update with Harrison: My contractions are slowing down but my most recent ultrasound shows vessels too close to my placenta. I'm not sure which vessels...I should ask more questions at the doctors office. Turns out I will need a C-section. I am terrified...

I am on "working" bed rest for about two weeks. This means that I can go to work, basically sit all day at my desk and when I get home I have to immediately rest. If my next ultrasound in 2 weeks shows no improvement I am on home bed rest. If the vessel is even closer - hospital bed rest.

Oh man. How is bed rest possible with a toddler and all of these to-do's?

I'm going to try to take it easy.


Rug & Chair are ordered!

When I first started decorating Harrison's room I wanted to go with a very neutral theme.
Obviously, that didn't happen! There is something about red, white and blue's that aren't so neutral!
I found the perfect rug online a few days ago.
Star Bordered Rug
I ordered the chair and ottoman. I am taking a risk getting this in crimson red. I'm not sure how it will look but hopefully it will add spunk to the room.

I think the contrast of the white and tan walls will make the crimson twill pop. At first I wanted to go with a neutral chair in hopes to move it when Harrison decides that having a chair in his room is no longer "cool."

By that time I'm sure the chair will be due for another slip cover.

What are your big furniture splurges?

Related Posts Plugin for WordPress, Blogger...